Monday September 5, 2016 at 9:28am
There are a few different animating tools within Visualize Professional but in this blog we will use the watch to illustrate the power of the automatic rotation animations, a method of doing quick and easy rotation animations with little effort.
There
are a few different animating tools within Visualize Professional but in this
blog we will use the watch to illustrate the power of the automatic rotation
animations, a method of doing quick and easy rotation animations with little
effort. This can be great for things such as car wheels or in this instance,
watch hands. In the following video you can see the hands moving round. This is
done with just a couple of clicks but will make your designs pop and come to
life.
Step 1:
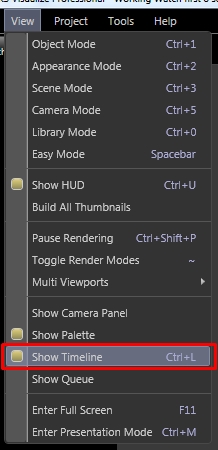
To start any animation off you need to view the timeline. This can be found in View > Show timeline or CNTL + L as a shortcut.

Step 2:
Ensure your tree structure is suitable and you can select the parts you need with nothing you don’t want to be rotated being accidentally selected.

Step 3:
Find the parts you want to rotate (in this case I want to rotate my watch hands), and right click and select ‘Add rotation Animation’. This will add you rotation to the timeline under whatever you named your parts as plus ‘Rotation Animation’ so you may want to rename your parts before adding your animation.

Step 4:
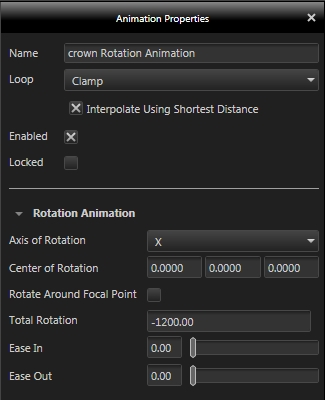
If you select the keys you can simply input the start or end times for this rotation. If you select the coloured space in-between the keys the animation properties appear on the right hand side of the timeline where you can edit things such as ‘Total Rotation’ and the ‘Axis of rotation’ as well as Ease In and Ease out which means you can make your parts accelerate and decelerate.


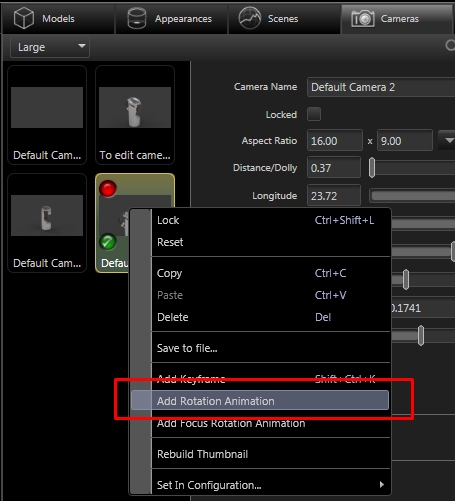
NOTE: You can also add a rotation animation to cameras so if you wanted to rotate a selected camera around an axis by certain degrees it is easy to do so. All you need to do is right click on a camera in the camera tab and select ‘Add Rotation Animation’. This adds this rotation to your timeline and you can edit these in the same manner as the part animations.

You can see the other blogs in this series on Visualize Professional below
Visualize Why Go Pro? 1-Configurations
Visualize Why Go Pro? 2 -Render Queuing
Visualize Why Go Pro? 3 - Walkthroughs
Visualize Why Go Pro? 4 - Motion Blur and Camera Options
By Chris Green
Applications Engineer
Models edited from:
• Kalle K - https://grabcad.com/library/f360-demo-watch-1
• Steen Winther - https://grabcad.com/library/eta-6497-1-complete-watch-movement